Now that the final proofs are complete, and the datasets reviewed and testing, we're ready to start selling this book. If you're interested in purchasing this training manual, you can email me at dbutts@advsolinc.com, or call 877-438-2741 beginning Friday, Oct, 30th. The book will also be available for purchase on our website. A site license version will also be available, so if you're with a university, college or other training center, contact Scott Wolslager at swolsalger@advsolinc.com.
Now, on to more adventures....
thanks - David B.
Tuesday, October 27, 2009
Monday, October 19, 2009
Right Reading text in electrical families
Finally got a chance to test this out...if you don't like the fact that text rotates with the receptables in Revit MEP, do this...
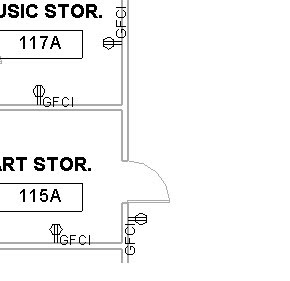
The text will read flat for horizontal surfaces and vertical for vertical surfaces, but all will be consistent, instead of just rotated around the symbol. Try using the rotate with family option under Categories and Parameters along with the keep text readable - when I did this, I got the same results, as long as the kep right reading option is checked.
- Open the duplex annotation family. Save it under a new name.
- Select the annotation symbol - open the family, and save it under a new name.
- Under Family Category and Parameters, make sure that Keep Text Readable is checked, and uncheck Rotate with component. Select OK.
- Save the annotation family, and then load it into the duplex receptable family.
- Save the duplex receptacle family, and then load it into a project.

The text will read flat for horizontal surfaces and vertical for vertical surfaces, but all will be consistent, instead of just rotated around the symbol. Try using the rotate with family option under Categories and Parameters along with the keep text readable - when I did this, I got the same results, as long as the kep right reading option is checked.
thanks - David B.
Brilliant Article on BIM
Came across this while looking for information on 64 bit performance in Revit...it's an artical from DPR construction, Transcending the BIM Hype: How to Make Sense and Dollars from Building Information Modeling:
http://www.aecbytes.com/viewpoint/2009/issue_48.html
The article is written by Eric Lamb, Dean Reed and Atul Khanzode of DPR Construction, Inc.
Even though this is a Bentley sponsored site, it speaks volumes as to the importance of setting the correct expectations of BIM.
Very well written - nice work guys!!!
thanks - David B.
Troubleshooting Startup Delays
Ryan Duell added a post to the Revit Clinic site on troubleshooting slow startup performance issues in Revit. I'm sure it will apply to all versions, so check this link out:
http://revitclinic.typepad.com/my_weblog/2009/10/troubleshooting-startup-delays.html
Thanks Ryan, for adding this post!
thanks - David B.
http://revitclinic.typepad.com/my_weblog/2009/10/troubleshooting-startup-delays.html
Thanks Ryan, for adding this post!
thanks - David B.
PIMM...in a Design World
Working on something new...everyone's heard of BIM (building information modeling), but I'm thinking more along the lines of PIMM...Process Information Modeling and Management). It's the case of where a building is really more of a part of process than an occupied structure. The idea is that you address a manufacturing process, whether it's treating wastewater or building cars, that the structure and components within become a part of a process from beginning to end for design, and then recycled for life cycle management.
To learn what this meant to different people, I started with PIM and found personal information management (makes sense), protocol independent multicast (now that's a mouthful) and Pakistan Intitute of Management among other things...so I decided to make sure both modeling and management are included in this paradigm.
Since we're really taking about not just the creation of the model but the management of the facility, I settled with PIMM...so who's interested in starting a new paradigm?
Remember, PIMM - you heard it here first...more to come on this one soon.
thanks - dab
The Revit MEP Advanced Book...Finally...
We're wrapping up final editing of the Revit MEP 2010 Advanced book. Chapters include an explanantion of the family editor and family types for MEP, exercises for creating non-hosted and hosted families, using third party content to create families, and a new section on customizing templates and some of the default data files. Look for an announcement at http://www.advsolinc.com/ in the coming days, and we'll be getting this class on the calender starting in November. Even if you're still on 2009, the process is still the same, so if you're trying to move beyond the basics in Revit MEP, this is a great class to take - and it's only one day!
talk to you soon - David B.
talk to you soon - David B.
Tuesday, October 13, 2009
Ceiling Grids and Engineers...oh my...!
Kudos to my buddy Bruce Johnson at William Tao for coming up with the issue and making me try it out...
Traditionally, the architect defines a ceiling grid in a project. The problem is that it isn't always correct in terms of layout so that the lighting works, so the engineer wants to create the grids themselves.
Enter Revit MEP 2010 - From the Architect tab, choose Ceiling, and then choose the Sketch Ceiling option. A new tab will open up and allow the engineer to create the boundary for the grid. If drawing lines, make sure you're using the chain option to tie them all together (I used rectangular for the boundary for proof of concept). Be careful with some of the snaps, as it may leave you with a open boundary error - if this happens, turn off the snaps and use the listening dimensions to drawing the sketch with the correct dimensions. Once the boundary is drawn, go to Ceiling Properties and check the grid type you want. Choose Finish Sketch to complete the command.
You can lock to boundaries to wall faces if needed, but if any of these constraints don't work you can use the good old fashioned manual method...
And you CONSTRAIN THE LIGHTS TO YOUR GRID...which means when the grid moves laterally, the lights will move as well.
Try it out - let me know what you think!
Thanks, Bruce!!!!
later - dab
Thursday, October 8, 2009
Filters tip for Piping
Tried a few different ways to make sure ALL components on a piping layout have the same color, etc, but the best way we've found to do it so far was to use the System Name to control the filter. In our book, we have the user that's laying out plumbing pipe include the text DCW, DHW, SGW, SBW as abbreviations in the system name with a space or dash behind each abbreviation - that way, the contains option can be used. What this means is that you can't use pipe unless it's assigned to a system - which for the most part, it should be anyway. To make sure that pipe runs going out of the building to a water source or waste connection work correctly is that you put a connector as the top or bottom end of these runs - that way the system includes both the target and source, creating the closed system.
Try it out and let me know what you think...
later - David B.
Try it out and let me know what you think...
later - David B.
Thursday, October 1, 2009
Line that Duct tag up...
Found this little nugget while working on the advanced book - to get a duct tag to align with a duct object, open a duct tag. Pick Family Categories and Parameters - there's an option that allows the tag to rotate with component. I'm sure this will follow the direction the duct is drawn in, but it may save a few steps when adding duct tags.
Now if I can just figure out how to associate an air terminal's offset elevation with a label in a tag...and make it automatic...joy...
later - dab
Now if I can just figure out how to associate an air terminal's offset elevation with a label in a tag...and make it automatic...joy...
later - dab
Revit MEP 2010 Web Update 2 is Available
Also available are updates for all Revit Products - for Revit MEP, go to this link:
http://usa.autodesk.com/adsk/servlet/item?siteID=123112&id=12899931
This update includes Update #1 if you didn't get it installed, but once it's been added the only way to remove is to uninstall Revit. Also, you must have administrator privileges to install the update.
later - dab
http://usa.autodesk.com/adsk/servlet/item?siteID=123112&id=12899931
This update includes Update #1 if you didn't get it installed, but once it's been added the only way to remove is to uninstall Revit. Also, you must have administrator privileges to install the update.
later - dab
AutoCAD MEP 2010 Update 1 is Available
Autodesk has release AutoCAD MEP 2010 Update 1 (and AutoCAD Architecture 2010 Update 1 as well) - for the MEP update, go to this link:
http://usa.autodesk.com/adsk/servlet/ps/dl/item?siteID=123112&id=13868521&linkID=8396518
later - dab
http://usa.autodesk.com/adsk/servlet/ps/dl/item?siteID=123112&id=13868521&linkID=8396518
later - dab
Type Parameters Post by Martin Schmid
Checking on the Autodesk Inside the Typepad blog, Martin wrote up a nice little explanation about Type parameters with electrical components - check it out, it will help with schedules -
http://inside-the-system.typepad.com/my_weblog/2009/09/the-case-for-type-parameters.html
later - dab
http://inside-the-system.typepad.com/my_weblog/2009/09/the-case-for-type-parameters.html
later - dab
Nested Annotations and Electrical Devices...
Still working on the best ways to handle annotations in electrical fixtures - the maintain annotation orientation switch only controls that one symbol...hadn't quite figured out how to get the text to stay right reading...watch for a new posted coming soon...
In the meantime, there's a quick way to add labels to a tag without having to add additional label elements in a tag. Open an existing tag and then save a copy of it. Select the label, and then choose Edit Label. From the Edit Label dialog, select the parameter you want to add to the tag. By default they're placed sequentially, so the new addition (which will show up in order in th dialog) will be at the end of the list. Select OK, and then use the grips to stretch the label width - if you want the labels stacked, make the width shorter - if you want them in a single line, make it wider.
Add separate label elements if you want to nest several types within a tag, then use the visibilty controls to turn the labels on and off as needed.
later - dab
Subscribe to:
Posts (Atom)